

Showing posts with label Being Prepared. Show all posts
Showing posts with label Being Prepared. Show all posts
Sunday, September 20, 2015
Small Batch Canning and Dehydrating

Saturday, September 19, 2015
Making Relish and Getting Ready for Fall!

Made my first batch of Zucchini Relish! Starting with small batches to make it easier. Next I will be making Red or Black Raspberry Jam and some Pickled Spiced Plums to serve with Pork Roast or Beef. The Fall centerpiece here on the table was an idea from Pinterest..thought it was pretty cute and easy to make.
Saturday, June 13, 2015
Dutch Oven Cooking Free Books
Here are just two of the many guides and books to dutch oven cooking for your campsite or homestead! Enjoy!

Camp Chief - Dutch Oven Cooking Guide
http://www.campchef.com/media/manuals/CastIronRecipeBook.pdf
Idaho State University - Dutch Oven Cookbook
http://www.isu.edu/outdoor/pdf/2012_cookbook.pdf

Camp Chief - Dutch Oven Cooking Guide
http://www.campchef.com/media/manuals/CastIronRecipeBook.pdf
Idaho State University - Dutch Oven Cookbook
http://www.isu.edu/outdoor/pdf/2012_cookbook.pdf
Friday, June 1, 2012
52 Week Food Storage
Here is a great list of options to buy each week. The point is to just start somewhere. Just add a little to your grocery list each week and you'll slowly build up a supply for your family. This list is not the best, but it does have some great options. Adapt this list to weekly grocery sales, your families likes & needs, etc.

Week 1: Two cans tuna fish, 1 box salt
Week 2: 5 boxes of Macaroni and Cheese, 4 cans tomato soup
Week 3: 3 cans mushroom soup, 1 2.5 lb peanut butter
Week 4: 1 bottle vitamins
Week 5: 4 cans tomato soup, 1 10 lb powdered milk
Week 6: 1 bottle aspirin (500 tablets)
Week 7: 1 100 lb container wheat
Week 8: 1 5 lb powdered milk
Week 9: 1 5 lb honey
Week 10: 4 cans tuna, 4 boxes macaroni and cheese
Week 11: 1 10 lb sugar, 1 box salt
Week 12: 4 cans mushroom soup
Week 13: 1 bottle vitamins
Week 14: 1 10 lb. potato flakes
Week 15: 1 box macaroni and cheese
Week 16: 1 5 lb honey
Week 17: 2 cans tuna, 4 can tomato soup
Week 18: 1 10 lbs sugar
Week 19: 1 25 lbs rice
Week 20: 2 10 lbs of sugar
Week 21: 10 lb powdered milk
Week 22: 1 can mushroom soup, 1 10 lb sugar
Week 23: 1 can tuna, 4 cans tomato soup, 1 10 lbs sugar
Week 24: 1 10 lbs sugar
Week 25: 2 cans tuna, 2 cans mushroom soup
Week 26: 1 50 lb wheat
Week 27: 3 10 lbs sugar
Week 28: 1 10 lb sugar
Week 29: 1 10 lb powdered milk
Week 30: 2 10 lb sugar
Week 31: 1 can tuna, 3 cans mushroom soup
Week 32: 1 can tuna, 4 cans tomato soup
Week 33: 1 25 lb wheat
Week 34: 2 cans tuna, 1 box salt
Week 35: 1 10 lb powdered milk
Week 36: 2 10 lb sugar
Week 37: 4 cans tomato soup, 2 boxes salt
Week 38: 1 25 lb wheat
Week 39: 3 cans canned chicken
Week 40: 1 10 lb powdered milk
Week 41: 3 10 lb sugar
Week 42: 2 cans tomato soup, 1 10 lb sugar
Week 43: 2 cans tomato soup, 2 cans mushroom soup
Week 44: 1 25 lbs rice
Week 45: 1 10 lb powdered milk
Week 46: 4 cans tomato soup, 4 cans mushroom soup
Week 47: 1 10 lb powdered milk
Week 48: 4 cans mushroom soup, 1 10 lb powdered milk
Week 49: 7 cans of tomato soup
Week 50: 7 cans of mushroom soup
Week 51: 2 10 lbs sugar, 1 box salt
Week 52: 1 5 lb honey

Friday, December 2, 2011
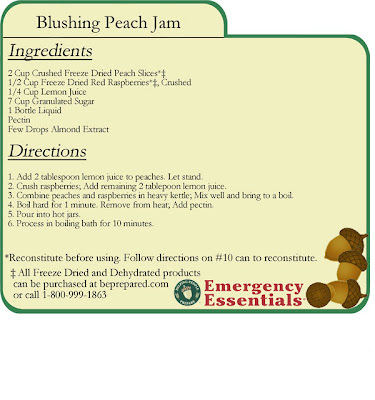
Using What You Store
The Emergency Essentials store has so many wonderful food and survival items to offer. I am not getting paid by this company, I just love their items and want people to be able to find a place they can trust for their needs. Here is a recipe from them on using some of what you store. Hope you enjoy!

Tuesday, November 29, 2011
Have You Thought About Rice and Beans?

You can purchase a 20lb. Bag of rice and a 10lb. Bag of pinto beans for about $22.00. The last a very long time if kept in a cool, dry place and once opened you can transfer them to sealed 5 gallon buckets with tight lids or smaller containers that have a good fitting lid. Mix taco seasoning with rice and beans for a great flavor. You can store dry spices and onions with you storage goods that make a wonderful addition to you rice and bean dishes. You may also want to store assorted cans of beans to help in a quick fix for food without the overnight soaking of the dry beans.
Long Grain White Rice – Calories
Long Grain White Rice – Nutrition per cup (cooked)
Fat (0.4 grams)
Carbohydrates (45 grams)
Fiber (0.6 grams)
Protein (4 grams)
Very low in saturated fat
No cholesterol
Very low in sodium
Very low in sugar
High in manganese
Pinto Beans – Calories
Pinto Beans – Nutrition per cup serving
Fat (1 gram)
Carbohydrates (45 grams)
Fiber (15 grams)
Protein (15 grams)
Very low in saturated fat
No cholesterol
Very low in sodium
Very low in sugar
Very high in dietary fiber
High in manganese
High in phosphorus
Here is a cheap recipe:
COCONUT RICE AND BEANS
Ingredients
1 15 oz. can of lite coconut milk ($1.39) Used coupon in this week’s newspaper for Thai kitchen products!
About 1/3 cup of pineapple juice from a can of pineapple ($.25-ish)
1/2 cup of water
1 cup uncooked white rice ($.20)
Salt/Pepper, to taste
2 cups cooked pinto beans ($.40)
4 carrot sticks, peeled and cut into circles ($.40)
Honey drizzles ($.25)
2 broccoli heads ($.74) On sale for $1.48/bunch this week!
Directions
(1/2. Cook about 1 cup of pinto beans in 6 cups of water. Bring to a boil and then reduce heat to medium high. Cover and cook for 1.5 -2 hours, or until beans are soft. Remove from heat, drain liquid.)
1. In medium saucepan, bring coconut milk, pineapple juice and water to a rolling boil. Add 1 cup of rice and return to boil. Cover and reduce heat to medium low and cook for 15 minutes. Turn off heat and let stand for 5 more minutes (do not uncover!). Fluff with fork before adding the beans.
2. Combine beans and rice in saucepan.
3. Steam carrots in steamer, or cook in 1/2 cup of water in small saucepan. Drizzle with honey to sweeten them up a smidge!
Steam broccoli in stovetop steamer or in microwavable bowl covered with plastic wrap.
Serve Coconut Rice and Beans with Honey Sweetened Carrots and Steamed Broccoli.
You can substitute the milk and juice with any flavor you desire! Cost $2.24
recipe was found at : http://www.5dollardinners.com/
recipe was found at : http://www.5dollardinners.com/
Friday, November 25, 2011
Food Storage Items
Here are a few items that are essential to any food storage kit. I like this site for these items. You should check it out. http://www.mredepot.com/servlet/StoreFront
1 Can of Future Essentials Freeze Dried Shredded Sharp Cheddar Cheese #2.5 Can / 10oz

1 Can of Future Essentials Freeze Dried Shredded Sharp Cheddar Cheese #2.5 Can / 10oz
This is REAL grated Sharp Cheddar cheese, and will melt after you rehydrate it. Future Essentials Freeze Dried Cheddar cheese can be used in many recipes including casseroles, tacos, soups, chili topping, and salads. Fresh weight replacement 1 to 4 (freeze dried - fresh prepared). Proudly using USA dairy, as well as canned and prepared in the states. $14.95 Each.
1 Can of Pure U.S. Canned Ghee / Clarified Butter - 14 oz Can
EXTREMELY LONG SHELF LIFE! HIGH QUALITY PURE CLARIFIED BUTTER FOR COOKING AND FLAVOR!!
This Clarified Butter / Ghee is made from pure butter in the U.S. under the strictest quality control standards. Ghee is GLUTEN FREE, and the most common cooking medium used worldwide instead of traditional cooking oils like Olive or Vegetable Oil, and it is actually considered to be healthier thank most oils. $7.50 Each
Hope you check these out, there are so many more items to choose from also. Smiles.....
Saturday, November 19, 2011
473 Recipes from the Boy Scouts of America

Here is a link to the Boy Scouts of America website that has 473 very easy Scout camping recipes. These are perfect for emergency cooking and everyday living because of the common and minimal number of ingredients.
Saturday, November 5, 2011
Surviving a Civil Breakdown Situation
Having a practical and workable plan of action to protect yourself, your family , and your property before social chaos erupts of martial law goes into effect. All you have to do is look to recent past events and how they were handled to see that this would be totally out of control on a national level.
Shelter, food, water, and security. These are the four basic elements you need to provide for. With an intelligent disaster plan, and the will to survive and a cache of food and supplies you will have what you need during the hard times.
In the event of a prolonged period of martial law and social chaos, you can expect to see radical changes to the way you live and the freedoms you now take for granted. These will include your right to assemble, free speech, and hoarding food or provisions.

The Basics for a 72 Hour Survival Kit
Use a backpack that you can realistically carry all the items you'll need.
Use the Rule of 3 When Making Your Kit: You could be dead in......
Three minutes without air
Three minutes from a severe wound
Three minutes from extreme freezing conditions
Three hours without shelter in severe weather
Three days without water
Three weeks without food
WATER AND FIRE:
In a major disaster, you may be faced with drinking from questionable sources. Always boil your water so you'll need to make a fire. Boiling the water gets rid of the bacteria so you can drink it. There are also water purification tablets which are effective but often bad tasting, but that should not stop you from using them if it means your life.
I suggest you carry at least three different methods: lighter, matches and a magnesium striker. Magnesium can be carried safely in a small block, but when you scrap the edge into small grit, it will ignite with a spark. The striker is a metal bar that when struck by the edge of a knife, for example, causes that high temperature spark. The wooden handles version is slightly different. The wood is oil soaked and the scraper is used to strap the wood to form tender which lights easily, even after a half hour under water.
Another tip to accelerate fire starting is to carry Cotton rubbed with petroleum jelly. I carry them in old film canisters or prescription bottles, both of which are water-resistant. The other benefits of fire are heat, cooking, protection from animals and a signal for rescue.
MEDICAL NEEDS:
In a major disaster, you will be the doctor until help arrives...harsh reality but true. You will want to know how to help yourself, family and friends with medical assistance. A good start for customizing your medical kit starts with the basics of band aids and alcohol pads and an instructive first aid manual. Of course, you will want to build on this with sterile gauze, tape and painkillers such as aspirin and Tylenol. If you have to take prescription medicine, try to have at least a 2 week supply, along with diabetic supplies if needed. Cough and cold medicines for adults and children if needed should be included in the kit. Also, extra inhalers if someone in your group has asthma. You should have finger splints, knee brace, ACE bandage and spare glasses if you or someone else wears them. Customize your kit for yourself and your families needs.

SHELTER GEAR:
Each kit should have an Emergency Survival Blanket, it can retain 90% of your body heat. They come in many sizes and qualities and can also be used for rain and shade protection.
A sturdy Poncho is also a must. It will keep the rain off of you and provide shade. A tarp is a good idea, as you can put it on the ground then cover it with a wool blanket to keep the chill from the ground off of you. Be sure to include some 550 Paracord. This will come in handy for a quick tent when tied between two trees or some kind of post..you drape your poncho over it and you have some shelter. You should also include hand warmers and feet warmers that are available through many websites or hardware stores.
THE RIGHT KIND OF CLOTHING:
You should have pants, t-shirt, long sleeve shirt, and underwear packed as a spare. Try to dress in these types of clothing too. Pack a sock hat and baseball cap for cold and heat, and wear good boots that support your ankles and are waterproof. Each kit should have three types of gloves...non-latex for treating wounds, work gloves to protect your hands and weather appropriate gloves for insulation or sun protection. Try to carry at least three pairs of extra socks, and dry all clothes by a fire or in the sun to keep them from causing you any problems.
FOOD AND PERSONAL HYGIENE
there are so many choices in survival foods today. You can buy MRE meals like the military uses or energy bars that provide 3500 calories for energy need. I like to choose my own types according to my tastes and my families tastes. This is where our kits get very customized. We always add, tea bags, hot cocoa and dry cups of soup packets. You can make trail mix with nuts, fruits, m & m's, crackers and cereal and store in ziploc bags. Cheese and Peanut Butter crackers are also good, along with hard candy and gum. Pick what you want, but make sure it will give you the energy you'll need. We also supplement these items with vitamins. It is a good idea to every once a month to go through the kits and replace any of the food that has expired. If you have a baby with you, be sure to add formula or dry milk and baby food.

In a survival situation, your 72 Hour Kit should have everything you need to handle all normal biological functions. So, to this part of the kit you should add toothpaste, toothbrush, comb and brush, a mess kit for eating (can be found in camping goods at a department store.) You will also need tissue, feminine products, shaving cream, razors, Q-tips, hand sanitizer, wet wipes and shampoo. Of course, add your own personal products as needed for each family member. Another wonderful thing to have is LED flashlights and extra batteries, Glow Sticks and Emergency candles which will help for lighting and reassurance when it is dark. It is a good choice too, to have a set of Walkie Talkies with fresh batteries. You will also want to have some cash on hand, suntan lotion, a folding knife and can opener. Be sure to customize your kit for YOUR needs and the people you are with. It is a good idea to store water and more food at home too. Along with sleeping bags, blankets, lanterns, axe and shovel and anything else you think would come in handy if you are lucky enough to stay at home. Always be prepared for the unexpected.
It is advisable to try to stay put in the midst of any chaos that may be happening in your community as a result of whatever crisis took place. I recommend that you establish a rally point for you and your family in the event that the emergency happens during a regular work and school day. Make home your number one rally point then have a secondary place, like another family members home in another part of town. Make sure everyone knows how to get to the rally points and to do so quickly and safely. Younger children, if at school or in day care, should be instructed to stay where they are until they are picked up by mom, dad, a sibling or grandparent..or even a trusted close friend. Make sure they understand the plan and that you will be there for them. This makes sense when a crisis happens because most often the children will be in school and on immediate lock-down.
Be prepared with your 72 hour emergency kits, and the extra stock of water, food and defense items that you have stocked up on. Ensure that your windows and doors can be securely locked, and you have exterior lighting and secure outer doors. A fence is a good idea also. Home defense begins at the door, never open the door to strangers and don't trust a stranger just because they are wearing a uniform. They must have ID to prove who they are before you have to comply. If you can, install a security screen door on the front door thus providing an extra layer of safety between you and the person on the street. With a fence, strong locked and bolted doors and maybe a big dog roaming the yard, hopefully whoever is trying to come through you defense system will stop before it comes to you last resort of defense, which should be the weapon of your choice that you and your family know how to use properly. If you have money to spend, you could even make one of the rooms in your home a “safe room”, with reinforced walls and doors.
In the event of a national emergency, you can almost count on a food shortages, rationing, and potentially even food riots. You really need to prepare as much as you can, while you can by stocking up on what you will need during this time. Don't try to sustain yourself indefinitely, just enough to get you through the crisis. It will help you to think more clearly when there is a crisis knowing that you prepared ahead of time. Because of how long it may takes it get the situation under control in the community and nationwide, I suggest you make provisions for at least 30 days with enough food and water for each person in your household. Ideally, you should have a 6 month supply, but this may not be realistic for most people.

Water....10 bottles of water per person each day at 12 ounces each. So, 50 cases of this water would supply a family of 4 people for 30 days. That's a lot of cases of water! Of course, you can also fill clean containers and store them for flushing the toilet and sponge bathing. You can add iodine drops to sterilize the water for drinking or boil it and this is a safe way of using water from ponds, streams, lakes, hot tubs, and swimming pools. You can invest in 5 gallon water bottles to store your water and use and refill them on a regular bases ensuring that they are fresh. In the first minutes of the disaster if you have the chance, fill your tubs with water and any containers you have left in the house. This will come in handy for many uses. Continue to use the tap water as long as it is available, but never use it if your community is flooded since it will be contaminated by overflowing sewage and make it unsafe to use. Be sure to store as much water as you can, and have back up plans on accessing water for long term survival from many different places. You need to plan for 3 meals a day, which is 90 meals per person for a 30 day period.
Subscribe to:
Posts (Atom)